"Storehouse" Application
This documentation includes description of the "Storehouse" application development process on the Scorocode platform as a demo. The application source code is available in the following repository: https://github.com/Scorocode/scorocode-sample-storehouse.
The application is made to manage mobile phones stock inside a dealer storehouse and allows you to:
- Register a new user in the application database
- Authenticate an application user
- De-authenticate an application user
- View available mobile phone models on stock in the storehouse
- Add a mobile phone model in the database
- Delete a mobile phone model from the database
- View full information about a mobile phone model
- Change information about a mobile phone model
- Select a certain mobile phone from a list using a filter
- Add a user on the waiting list for this phone model
- Ship this mobile phone model to the user
- Notify the accounting department about the shipment using an email message
- Notify a storehouse loading worker with a push message
- Notify a courier with an sms message
- Update the company's balance sheet taking into account the recent mobile phone shipment
Application Data Structure.
Let's create the storehouse collection with the following fields:
- platform (String)
- cameraInfo (String)
- deviceName (String)
- colorsAvailable (Array)
- devicePrice (Number)
- buyers (Array)
- lastSend (Date)
- sendInfo (File)
We add 3 documents inside the system collection Roles with the following corresponding values for the name field:
- deliveryPerson
- accountantPerson
- loaderPerson
Application Launch Screen.
Let's create a launch screen for our application and call it LoginActivity. To do so we will go File → New → Activity → Empty Activity in Android Studio and add the following code in the layout file of the Activity:
<?xml version="1.0" encoding="utf-8"?>
<RelativeLayout xmlns:android="http://schemas.android.com/apk/res/android"
    xmlns:tools="http://schemas.android.com/tools"
    android:id="@+id/activity_login"
    android:layout_width="match_parent"
    android:layout_height="match_parent"
    android:paddingBottom="@dimen/activity_vertical_margin"
    android:paddingLeft="@dimen/activity_horizontal_margin"
    android:paddingRight="@dimen/activity_horizontal_margin"
    android:paddingTop="@dimen/activity_vertical_margin"
    tools:context="prof_itgroup.ru.storehouseapp.Activities.LoginActivity">
    <LinearLayout
        android:layout_width="match_parent"
        android:layout_height="wrap_content"
        android:gravity="center"
        android:orientation="vertical">
        <TextView
            style="@style/label_style"
            android:layout_marginTop="16dp"
            android:text="@string/login" />
        <EditText
            android:id="@+id/etEmail"
            android:gravity="center"
            style="@style/textStyle"
            android:hint="@string/login_hint" />
        <TextView
            style="@style/label_style"
            android:layout_marginTop="16dp"
            android:text="@string/password"/>
        <EditText
            android:gravity="center"
            android:id="@+id/etPassword"
            style="@style/textStyle"
            android:hint="@string/password_hint"
            android:inputType="textPassword"
            android:maxLines="1" />
        <LinearLayout
            android:layout_width="wrap_content"
            android:layout_height="wrap_content"
            android:gravity="center_horizontal"
            android:orientation="vertical">
            <Button
                android:id="@+id/btnLogin"
                android:layout_width="match_parent"
                android:layout_height="wrap_content"
                android:layout_marginTop="4dp"
                android:text="@string/login_button_text" />
            <Button
                android:id="@+id/btnRegister"
                android:layout_width="match_parent"
                android:layout_height="wrap_content"
                android:layout_marginTop="4dp"
                android:text="@string/register_button_text" />
        </LinearLayout>
    </LinearLayout>
</RelativeLayout>LoginActivity class is shown in Figure 1.1.
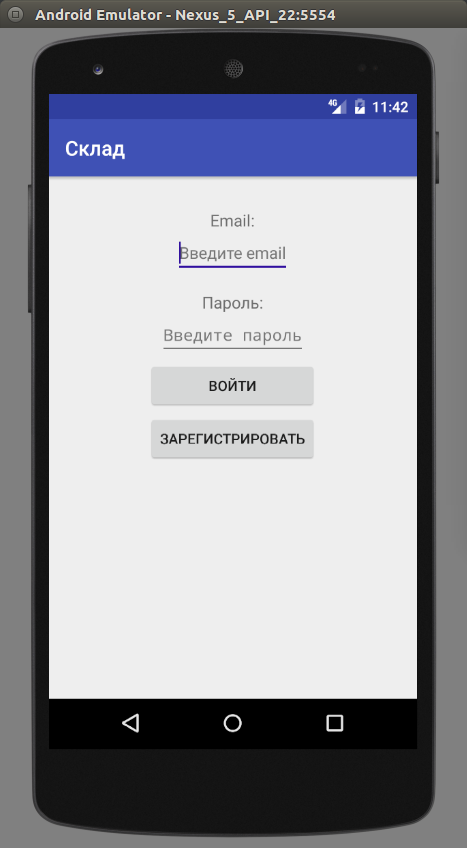
Figure 1.1 – application launch screen.
Let's add the following code lines in the onCreate method of the LoginActivity class:
@Override
protected void onCreate(Bundle savedInstanceState) {
    super.onCreate(savedInstanceState);
    setContentView(R.layout.activity_login);
    if (isUserLogined(this)) {
        MainActivity.display(this);
    }
    ScorocodeSdk.initWith(APPLICATION_ID, CLIENT_KEY, null, FILE_KEY, MESSAGE_KEY, SCRIPT_KEY, null);
    ButterKnife.bind(this);
}
ScorocodeSdk initialization is happening in the onCreate method with keys appId, clientKey (android), fileKey, messageKey, scriptKey using the ScorocodeSdk.initWith(...) method. These keys can be viewed at the «Security» tab in the project Settings.
On this screen, a database user can enter their system login and password. The application will check whether they are correct using the .login() method of the User class. This method is demonstrated in a listing:
@OnClick(R.id.btnLogin)
public void onBtnLoginClicked() {
    User user = new User();
    user.login(etEmail.getText().toString(), etPassword.getText().toString(), new CallbackLoginUser() {
        @Override
        public void onLoginSucceed(ResponseLogin responseLogin) {
            DocumentInfo userInfo = responseLogin.getResult().getUserInfo();
            saveUserInfo(userInfo);
            MainActivity.display(LoginActivity.this);
        }
        @Override
        public void onLoginFailed(String errorCode, String errorMessage) {
            Helper.showToast(getBaseContext(), R.string.error_login);
        }
    });
}
In this method, we create a new sample of the User class and run its login method. The information about a user's email and password is taken from the corresponding EditText. The login method will check that a user with this email and this password exists in the «users» collection.
In case such user exists in the «users» collection, the onLoginSucceed(...) callback method will be executed. Otherwise it the onFoginFailed(...) method that will be executed. Thus, we can be sure whether such user exists in our database and act accordingly.
On the launch screen (see illustration 1.1) we also have the «Register» button which allows to register a new user in the system (add to the «users» database collection). Let's connect this button to the button click handler which opens an Activity with user's data needed for registration:
@OnClick(R.id.btnRegister)
public void onBtnRegisterClicked() {
    RegisterActivity.display(this);
}
New User Registration Screen.
Let's create an new Activity called RegisterActivity and add the following xml code in the layout file of this Activity:
<?xml version="1.0" encoding="utf-8"?>
<LinearLayout xmlns:android="http://schemas.android.com/apk/res/android"
    xmlns:tools="http://schemas.android.com/tools"
    android:id="@+id/activity_register"
    android:layout_width="match_parent"
    android:layout_height="match_parent"
    android:gravity="center_horizontal"
    android:orientation="vertical"
    android:paddingBottom="@dimen/activity_vertical_margin"
    android:paddingLeft="@dimen/activity_horizontal_margin"
    android:paddingRight="@dimen/activity_horizontal_margin"
    android:paddingTop="@dimen/activity_vertical_margin"
    tools:context="prof_itgroup.ru.storehouseapp.Activities.RegisterActivity">
    <TextView
        style="@style/label_style"
        android:text="@string/register_username" />
    <EditText
        android:id="@+id/etUsername"
        style="@style/textStyle"
        android:hint="@string/register_username_hint"/>
    <TextView
        android:layout_marginTop="16dp"
        style="@style/label_style"
        android:text="@string/register_email" />
    <EditText
        android:id="@+id/etEmail"
        style="@style/textStyle"
        android:hint="@string/register_email_hint"/>
    <TextView
        android:layout_marginTop="16dp"
        style="@style/label_style"
        android:text="@string/register_password" />
    <EditText
        android:id="@+id/etPassword"
        style="@style/textStyle"
        android:inputType="textPassword"
        android:hint="@string/register_email_password"/>
    <EditText
        android:id="@+id/etPasswordCheck"
        style="@style/textStyle"
        android:inputType="textPassword"
        android:hint="@string/register_email_password_again"/>
    <Button
        android:layout_marginTop="32dp"
        android:id="@+id/btnRegister"
        style="@style/textStyle"
        android:text="@string/btn_register_text"/>
</LinearLayout>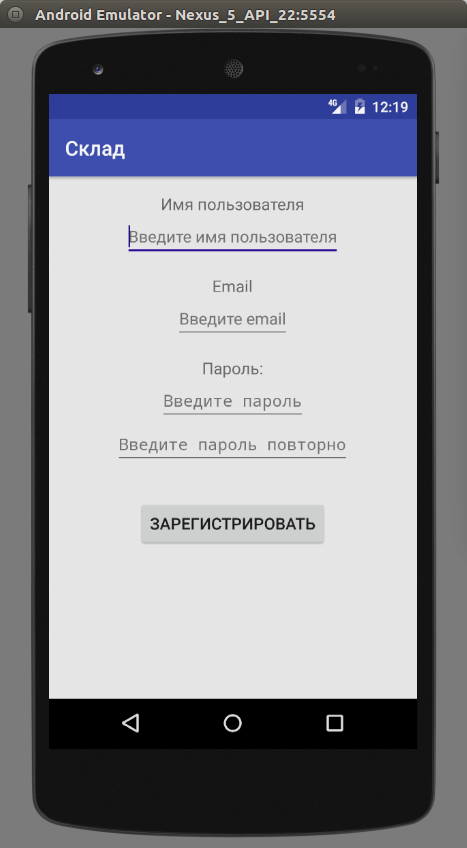
Figure 1.2 — a new user registration screen.
All document fields needed for a user registration are listed on this screen. Let's add the button click event handler for the «Register» button which will run the .register method of the User class, as shown below:
@OnClick(R.id.btnRegister)
public void onBtnRegisterClicked() {
    String userName = etUsername.getText().toString();
    String email = etEmail.getText().toString();
    String password = etPassword.getText().toString();
    String passwordCheck = etPasswordCheck.getText().toString();

    if(isInputValid(userName, email, password, passwordCheck)) {
        new User().register(userName, email, password, new CallbackRegisterUser() {
            @Override
            public void onRegisterSucceed() {
                Toast.makeText(RegisterActivity.this, getResources().getString(R.string.register_succeed), Toast.LENGTH_SHORT).show();
                LoginActivity.display(RegisterActivity.this);
            }
            @Override
            public void onRegisterFailed(String errorCode, String errorMessage) {
                Toast.makeText(RegisterActivity.this, getResources().getString(R.string.error_register), Toast.LENGTH_SHORT).show();
            }
        });
    } else {
        Toast.makeText(this, getResources().getString(R.string.wrong_data) , Toast.LENGTH_SHORT).show();
    }
}
In this method, we get values entered in the EditText elements, e.g.: a user name, their email, password and repeated password (for a check).
Then using the isInputValid method we check that the fields are not left empty and that the values, entered into the two password fields are identical. Afterwards, we can run the .register method of the User class.
In case the user registration was a success (i.e. if the SDK is initiated, all keys are correct and there is no conflict with existing users), the interface onRegisterSucceed(...) callback method will be executed. Otherwise it is the onRegisterFailed(...) method that will be executed.
In this case, if the registration is a success, a Toast message will be shown with a note that the user is registered. Then the LoginActivity activity begins so that the user can log in and start working with the application.
Application Main Screen.
Let's create the application main page called MainActivity and add the following xml code in the layout file of this Activity:
<?xml version="1.0" encoding="utf-8"?>
<RelativeLayout
    xmlns:android="http://schemas.android.com/apk/res/android"
    xmlns:tools="http://schemas.android.com/tools"
    android:id="@+id/activity_main"
    android:layout_width="match_parent"
    android:layout_height="match_parent"
    android:paddingLeft="@dimen/activity_horizontal_margin"
    android:paddingRight="@dimen/activity_horizontal_margin"
    android:paddingTop="@dimen/activity_vertical_margin"
    android:paddingBottom="@dimen/activity_vertical_margin"
    tools:context="prof_itgroup.ru.storehouseapp.Activities.MainActivity">
    <ListView
        android:id="@+id/lvItemsInStorehouse"
        android:layout_width="match_parent"
        android:layout_height="wrap_content"/>
</RelativeLayout>
This is the ListView Activity which we fill with the data about goods stored in the database. In addition, the Activity contains ActionBar icons. We will talk about them in some detail later on.
Let's create an adapter called StoreItemAdapter to show us the data with the following code:
package prof_itgroup.ru.storehouseapp.Objects;
import android.content.Context;
import android.support.annotation.NonNull;
import android.view.LayoutInflater;
import android.view.View;
import android.view.ViewGroup;
import android.widget.BaseAdapter;
import android.widget.TextView;
import java.util.List;
import butterknife.BindView;
import butterknife.ButterKnife;
import prof_itgroup.ru.storehouseapp.Activities.ItemDetailsActivity;
import prof_itgroup.ru.storehouseapp.R;
import ru.profit_group.scorocode_sdk.scorocode_objects.DocumentInfo;

public class StoredItemsAdapter extends BaseAdapter {
    private Context context;
    private List<DocumentInfo> storedItems;
    private int layoutId;
    private LayoutInflater inflater;
    private DocumentFields fields;
    public StoredItemsAdapter(Context context, @NonNull List<DocumentInfo> storedItems, int layoutId) {
        this.context = context;
        this.storedItems = storedItems;
        this.layoutId = layoutId;
        inflater = LayoutInflater.from(context);
        fields = new DocumentFields(context, null);
    }
    @Override
    public int getCount() {
        return storedItems.size();
    }
    @Override
    public Object getItem(int position) {
        return storedItems.get(position);
    }
    @Override
    public long getItemId(int position) {
        return position;
    }
    @Override
    public View getView(int position, View view, ViewGroup parent) {
        ViewHolder holder;
        if (view != null) {
            holder = (ViewHolder) view.getTag();
        } else {
            view = inflater.inflate(layoutId, parent, false);
            holder = new ViewHolder(view);
            view.setTag(holder);
        }
        customizeView(view, holder, storedItems.get(position));
        return view;
    }
    private void customizeView(View view, ViewHolder holder, final DocumentInfo documentInfo) {
        String deviceName = (String) documentInfo.getFields().get(fields.getDeviceNameField());
        String devicePlatform = (String) documentInfo.getFields().get(fields.getPlatformField());
        Double devicePrice = (Double) documentInfo.getFields().get(fields.getDevicePriceField());
        holder.tvStoredItemName.setText(deviceName);
        holder.tvStoredItemStatus.setText(devicePlatform);
        holder.tvStoredItemPrice.setText(String.valueOf(devicePrice));
        view.setOnClickListener(new View.OnClickListener() {
            @Override
            public void onClick(View v) {
                ItemDetailsActivity.display(context, documentInfo);
            }
        });
    }
    static class ViewHolder {
        @BindView(R.id.tvStoredItemName) TextView tvStoredItemName;
        @BindView(R.id.tvStoredItemPlatform) TextView tvStoredItemStatus;
        @BindView(R.id.tvStoredItemPrice) TextView tvStoredItemPrice;
        public ViewHolder(View view) {
            ButterKnife.bind(this, view);
        }
    }
}
We will use the following layout file as a list element:
 <?xml version="1.0" encoding="utf-8"?>
<RelativeLayout xmlns:android="http://schemas.android.com/apk/res/android"
    android:layout_width="match_parent"
    android:layout_height="match_parent"
    android:orientation="horizontal"
    android:padding="8dp">
    <TextView
        android:id="@+id/tvStoredItemName"
        style="@style/textStyle"
        android:layout_alignParentLeft="true"
        android:layout_toLeftOf="@+id/tvStoredItemPlatform"
        android:text="@string/storedItemName" />
    <TextView
        android:id="@+id/tvStoredItemPlatform"
        style="@style/textStyle"
        android:layout_marginRight="32dp"
        android:layout_toLeftOf="@+id/tvStoredItemPrice"
        android:text="@string/storedItemStatus" />
    <TextView
        android:id="@+id/tvStoredItemPrice"
        style="@style/textStyle"
        android:layout_alignParentRight="true"
        android:text="@string/storedItemPrice" />
</RelativeLayout>
We will get the data about stored goods in the onResume() method of the MainActivityActivity. For this let's add the following code lines in the onResume method:
@Override
protected void onResume() {
    super.onResume();
    Query query = new Query(COLLECTION_NAME);
    query.findDocuments(new CallbackFindDocument() {
        @Override
        public void onDocumentFound(List<DocumentInfo> documentInfos) {
            if(documentInfos != null) {
                setAdapter(documentInfos);
            }
        }
        @Override
        public void onDocumentNotFound(String errorCode, String errorMessage) {
            Toast.makeText(MainActivity.this, getResources().getString(R.string.error_get_docs), Toast.LENGTH_SHORT).show();
        }
    });
}
In this code we create a Query object sample without setting any parameters (i.e. we choose the first 100 documents from this collection) and then we get the documents from our collection with the findDocument method.
In case we were successful in finding the documents, we install the adapter. Otherwise, we transmit the error message.
Let's also add the icons we need in the ActionBar Activity. For this, we will create the main_activity_menu layout file and add the following xml code:
<menu xmlns:android="http://schemas.android.com/apk/res/android"
    xmlns:app="http://schemas.android.com/apk/res-auto">
    <item
        android:id="@+id/action_add_item"
        android:icon="@drawable/ic_create_new_folder_white_24dp"
        android:title="@string/action_add_item"
        app:showAsAction="always"/>
    <item
        android:id="@+id/action_set_filter"
        android:icon="@drawable/ic_filter_list_white_24dp"
        android:title="@string/action_filter_item"
        app:showAsAction="ifRoom"/>
    <item
        android:id="@+id/action_logout"
        android:icon="@drawable/ic_exit_to_app_white_24dp"
        android:title="@string/action_logout_item"
        app:showAsAction="ifRoom"/>

</menu>
This means that we will show icons "Add an item to the database", "Set a filter" and "Logout" in the ActionBar. We can add these icons to the activity screen with the following code lines:
@Override
public boolean onCreateOptionsMenu(Menu menu) {
    getMenuInflater().inflate(R.menu.main_activity_menu, menu);
    return super.onCreateOptionsMenu(menu);
}
We will handle icons clicks with the method described below:
@Override
public boolean onOptionsItemSelected(MenuItem item) {
    switch (item.getItemId()) {
        case R.id.action_add_item:
            AddItemActivity.display(this);
            break;

        case R.id.action_set_filter:
            new FilterDialog(this).showFilterDialog(new FilterDialog.CallbackFilterDialog() {
                @Override
                public void onFilterApplied(List<DocumentInfo> documentInfo) {
                    setAdapter(documentInfo);
                }
            });
            break;

        case R.id.action_logout:
            LoginActivity.logout(this);
            break;
    }
    return super.onOptionsItemSelected(item);
}
The completed screen for this activity is shown in Figure 2.1
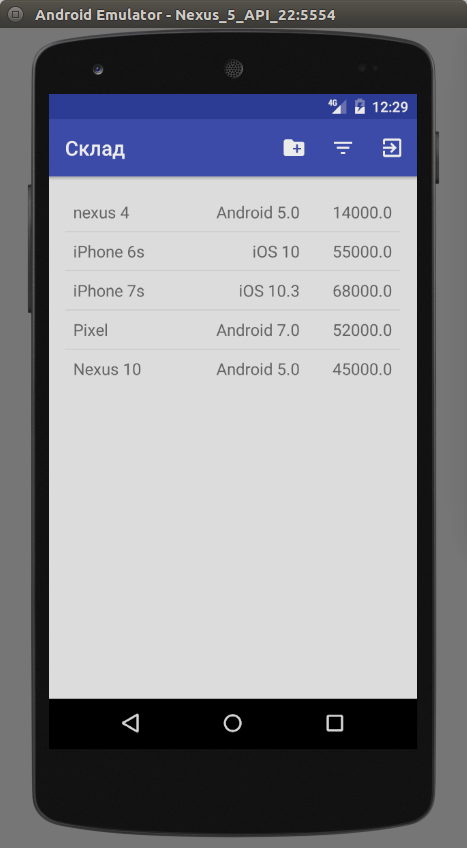
Figure 2.1 — main application screen
On this screen, we can see available mobile phone models which are kept in our storehouse. The following icons are shown in the right upper corner:
 - Add new item (mobile phone model) to the database.
 - Apply a filter to the list of items.
 - End an active session (logout).
After clicking on the button, a user switches to the item adding screen of the application.
Add an Item Screen
Let's create an Acitivity called AddItemActivity and add the folowing xml code to its layout file:
<?xml version="1.0" encoding="utf-8"?>
<LinearLayout xmlns:android="http://schemas.android.com/apk/res/android"
    xmlns:tools="http://schemas.android.com/tools"
    android:id="@+id/activity_add_item"
    android:layout_width="match_parent"
    android:layout_height="match_parent"
    android:orientation="vertical"
    android:padding="8dp"
    tools:context="prof_itgroup.ru.storehouseapp.Activities.AddItemActivity">
    <ScrollView
        android:layout_width="match_parent"
        android:layout_height="wrap_content">
        <include layout="@layout/item_core"/>
    </ScrollView>
</LinearLayout>
In turn, the activated item_core.xml file represents of the following lines:
<LinearLayout android:layout_width="match_parent"
    android:layout_height="wrap_content"
    android:orientation="vertical"
    xmlns:android="http://schemas.android.com/apk/res/android">
    <TextView
        style="@style/label_style"
        android:text="@string/add_item_device_name" />
    <EditText
        android:id="@+id/etDeviceName"
        style="@style/textStyle"
        android:hint="@string/add_item_hint_device_name" />
    <TextView
        style="@style/label_style"
        android:text="@string/add_item_device_platform" />
    <EditText
        android:id="@+id/etDevicePlatform"
        style="@style/textStyle"
        android:hint="@string/add_item_hint_device_platform" />
    <TextView
        style="@style/label_style"
        android:text="@string/add_item_camera_info" />
    <EditText
        android:id="@+id/etDeviceCameraInfo"
        style="@style/textStyle"
        android:hint="@string/add_item_hint_camera_info" />
    <TextView
        style="@style/label_style"
        android:text="@string/add_item_available_colors_info" />
    <EditText
        android:id="@+id/etDeviceColors"
        style="@style/textStyle"
        android:hint="@string/add_item_hint_available_colors_info" />
    <LinearLayout
        android:id="@+id/llChangeColorList"
        android:visibility="gone"
        android:gravity="center_horizontal"
        android:orientation="horizontal"
        android:layout_width="match_parent"
        android:layout_height="wrap_content">
        <Button
            android:id="@+id/btnAddColor"
            android:padding="12dp"
            android:layout_marginRight="8dp"
            android:text="@string/add_color"
            android:layout_width="wrap_content"
            android:layout_height="wrap_content" />
        <Button
            android:id="@+id/btnRemoveColor"
            android:padding="12dp"
            android:layout_marginLeft="8dp"
            android:text="@string/remove_color"
            android:layout_width="wrap_content"
            android:layout_height="wrap_content" />
    </LinearLayout>
    <TextView
        style="@style/label_style"
        android:text="@string/add_item_price" />
    <EditText
        android:id="@+id/etDevicePrice"
        style="@style/textStyle"
        android:inputType="number"
        android:hint="@string/add_item_hint_available_amount_info" />
    <LinearLayout
        android:id="@+id/llChangePrice"
        android:visibility="gone"
        android:gravity="center_horizontal"
        android:orientation="horizontal"
        android:layout_width="match_parent"
        android:layout_height="wrap_content">
        <Button
            android:id="@+id/btnIncreaseCount"
            android:padding="8dp"
            android:layout_marginRight="8dp"
            android:text="@string/increase_item_count"
            android:layout_width="wrap_content"
            android:layout_height="wrap_content" />
        <Button
            android:id="@+id/btnDecreaseCount"
            android:padding="8dp"
            android:layout_marginLeft="8dp"
            android:text="@string/decrease_item_count"
            android:layout_width="wrap_content"
            android:layout_height="wrap_content" />
    </LinearLayout>
    <LinearLayout
        android:orientation="vertical"
        android:gravity="center"
        android:layout_gravity="center"
        android:layout_width="200dp"
        android:layout_height="wrap_content"
        android:weightSum="1">
        <Button
            android:id="@+id/btnAddItem"
            android:padding="8dp"
            android:background="#64b5f6"
            android:textColor="@android:color/white"
            android:layout_width="match_parent"
            android:layout_height="wrap_content"
            android:layout_gravity="center_horizontal"
            android:layout_marginTop="8dp"
            android:text="@string/add" />
        <Button
            android:id="@+id/btnClear"
            android:padding="8dp"
            android:background="#64b5f6"
            android:textColor="@android:color/white"
            android:layout_width="match_parent"
            android:layout_height="wrap_content"
            android:layout_gravity="center_horizontal"
            android:layout_marginTop="8dp"
            android:text="@string/button_clear"
            android:layout_weight="0.22" />
    </LinearLayout>
</LinearLayout>
The final activity screen is shown in Fugure 2.2
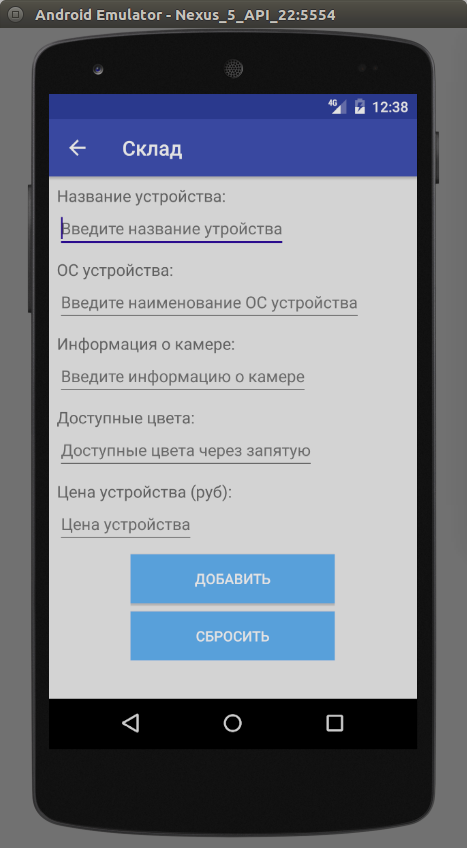
Figure 2.2 — Add an Item screen.
On this screen, a user enters all necessary information about the device (item) and presses on the «ADD» button. With this, the program creates a new document, fills its fields and saves on a server. Let's add the following activities: defining a click handler for the «ADD» button which will run the method described below:
@OnClick(R.id.btnAddItem)
public void onBtnAddItemClicked() {
    Document document = new Document(MainActivity.COLLECTION_NAME);
    if (isAllFieldsFilled()) {
        document.setField(fields.getDeviceNameField(), getStringFrom(etDeviceName).trim());
        document.setField(fields.getPlatformField(), getStringFrom(etDevicePlatform).trim());
        document.setField(fields.getCameraInfoField(), getStringFrom(etDeviceCameraInfo).trim());
        document.setField(fields.getColorsAvailableField(), getColorsListFrom(getStringFrom(etDeviceColors)));
        document.setField(fields.getDevicePriceField(), Double.valueOf(getStringFrom(etDevicePrice)));
        document.saveDocument(new CallbackDocumentSaved() {
            @Override
            public void onDocumentSaved() {
                Toast.makeText(AddItemActivity.this, getString(R.string.succed_add_item), Toast.LENGTH_SHORT).show();
                finish();
            }

            @Override
            public void onDocumentSaveFailed(String errorCode, String errorMessage) {
                Toast.makeText(AddItemActivity.this, getString(R.string.error_add_item), Toast.LENGTH_SHORT).show();
            }
        });
    } else {
        Toast.makeText(this, getString(R.string.wrong_data), Toast.LENGTH_SHORT).show();
    }
}
In this method we create a sample of the Document class, check whether a user has provided all necessary information in the corresponding EditText fields and set the document fields with the setField(…) method. Then we save the document. Since the document was created without a connection with a real document form the database (i.e. without using the getDocumentById() method), the new created document with the set fields will be uploaded to a server.
Documents are stored in the Scorocode database as shown on Figure 2.3
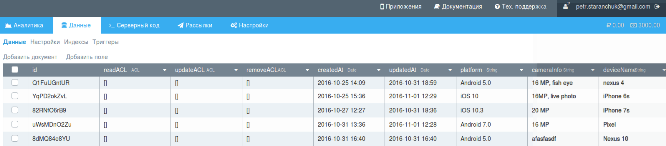
Figure 2.3 — storing documents in the Scorocode database.
Each document contains system and user's fields. System fields are:
- id — unique document ID in the collection.
- readACL — permission to read this document.
- updateACL — permission to update this document.
- removeACL — permission to delete this document.
- createdAt — time of the document creation.
- updatedAt - time of the document last update.
A user can add other fields at their discretion with the «Add a field» button in the upper panel. They can also add a document with the «Add a document» button in the upper panel and enter data in the fields manually. For more information on the database upper panel features, please, see Scorocode documentation.
When clicking on the button a user enter the filter dialog screen.
Let's create this filter dialog screen. For this, we need to create the FilterDialog class using the following code:
package prof_itgroup.ru.storehouseapp.Objects;
import android.content.Context;
import android.content.DialogInterface;
import android.support.v7.app.AlertDialog;
import android.view.LayoutInflater;
import android.view.View;
import android.widget.CheckBox;
import android.widget.EditText;
import java.util.ArrayList;
import java.util.Arrays;
import java.util.List;
import butterknife.ButterKnife;
import prof_itgroup.ru.storehouseapp.Activities.MainActivity;
import prof_itgroup.ru.storehouseapp.Helpers.Helper;
import prof_itgroup.ru.storehouseapp.R;
import ru.profit_group.scorocode_sdk.Callbacks.CallbackFindDocument;
import ru.profit_group.scorocode_sdk.scorocode_objects.DocumentInfo;
import ru.profit_group.scorocode_sdk.scorocode_objects.Query;

public class FilterDialog {
    private Context context;
    public FilterDialog(Context context) {
        this.context = context;
    }
    public void showFilterDialog(final CallbackFilterDialog callbackFilterDialog) {
        final View v = LayoutInflater.from(context).inflate(R.layout.filter_layout, null);
        final CheckBox cbPriceFilter = ButterKnife.findById(v, R.id.cbPriceFilter);
        final CheckBox cbPlatformFilter = ButterKnife.findById(v, R.id.cbPlatformFilter);
        final CheckBox cbColourFilter = ButterKnife.findById(v, R.id.cbColorFilter);
        final EditText etPlatformFilter = ButterKnife.findById(v, R.id.etPlatformFilter);
        final EditText etColors = ButterKnife.findById(v, R.id.etColors);
        AlertDialog.Builder builder = new AlertDialog.Builder(context)
                .setTitle(R.string.titleChooseFilterProperties)
                .setPositiveButton(R.string.continue_action, new DialogInterface.OnClickListener() {
                    @Override
                    public void onClick(DialogInterface dialog, int which) {
                        Query query = new Query(MainActivity.COLLECTION_NAME);
                        if (cbPriceFilter.isChecked()) {
                            setPriceFilter(v, query);
                        }
                        if (cbPlatformFilter.isChecked()) {
                            query.equalTo(new DocumentFields(context).getPlatformField(), etPlatformFilter.getText().toString());
                        }
                        if(cbColourFilter.isChecked()) {
                            List<Object> colors = new ArrayList<>();
                            colors.addAll(Arrays.asList(Helper.getStringFrom(etColors).split(",")));
                            query.containedIn(new DocumentFields(context).getColorsAvailableField(), colors);
                        }
                        query.findDocuments(new CallbackFindDocument() {
                            @Override
                            public void onDocumentFound(List<DocumentInfo> documentInfos) {
                                 callbackFilterDialog.onFilterApplied(documentInfos);
                            }
                            @Override
                            public void onDocumentNotFound(String errorCode, String errorMessage) {
                                Helper.showToast(context, R.string.error);
                            }
                        });
                    }
                }).setView(v);
        builder.show();
    }
    private void setPriceFilter(View view, Query query) {
        String priceField = new DocumentFields(view.getContext()).getDevicePriceField();
        final CheckBox cbIncludeLower = ButterKnife.findById(view, R.id.cbIncludeLower);
        final CheckBox cbIncludeUpper = ButterKnife.findById(view, R.id.cbIncludeUpper);
        final EditText etLowerPrice = ButterKnife.findById(view, R.id.etPriceFrom);
        final EditText etUpperPrice = ButterKnife.findById(view, R.id.etPriceTo);
        if(cbIncludeLower.isChecked()) {
            query.greaterThenOrEqualTo(priceField, getPrice(etLowerPrice));
        } else {
            query.greaterThan(priceField, getPrice(etLowerPrice));
        }
        if(cbIncludeUpper.isChecked()) {
            query.lessThanOrEqualTo(priceField, getPrice(etUpperPrice));
        } else {
            query.lessThan(priceField, getPrice(etUpperPrice));
        }
    }
    private Double getPrice(EditText etPrice) {
        String price = etPrice.getText().toString();
        Double priceDouble = 0d;
        if(!price.isEmpty()) {
            priceDouble = Double.valueOf(price);
        }
        return priceDouble;
    }
    public interface CallbackFilterDialog {
        void onFilterApplied(List<DocumentInfo> documentInfo);
    }
}
In the showFilterDialog method we create AlertDialog and set its View from the following layout file:
 <?xml version="1.0" encoding="utf-8"?>
<LinearLayout xmlns:android="http://schemas.android.com/apk/res/android"
    android:orientation="vertical"
    android:padding="16dp"
    android:layout_width="match_parent"
    android:layout_height="match_parent">
    <include layout="@layout/price_filter_layout" />

    <include layout="@layout/dilimeter" />

    <include layout="@layout/platform_filter" />

    <include layout="@layout/dilimeter" />

    <LinearLayout
        android:orientation="horizontal"
        android:layout_width="match_parent"
        android:layout_height="wrap_content">
        <CheckBox
            android:id="@+id/cbColorFilter"
            android:layout_width="wrap_content"
            android:layout_height="wrap_content" />
        <TextView
            android:text="@string/colorsFilter"
            style="@style/label_style"/>
        <EditText
            android:id="@+id/etColors"
            android:layout_marginLeft="16dp"
            android:hint="@string/color_filter_hint"
            style="@style/label_style" />
    </LinearLayout>
</LinearLayout>
The layout files price_filter_layout and platform_filter are shown below:
<?xml version="1.0" encoding="utf-8"?>
<LinearLayout xmlns:android="http://schemas.android.com/apk/res/android"
    xmlns:tools="http://schemas.android.com/tools"
    android:orientation="vertical"
    android:layout_width="match_parent"
    android:layout_height="wrap_content"
    tools:showIn="@layout/filter_layout">
    <LinearLayout
        android:orientation="horizontal"
        android:layout_width="match_parent"
        android:layout_height="wrap_content">
        <CheckBox
            android:id="@+id/cbPriceFilter"
            android:layout_width="wrap_content"
            android:layout_height="wrap_content" />
        <TextView
            android:layout_marginLeft="8dp"
            android:layout_marginStart="8dp"
            android:text="@string/filter_price_from"
            style="@style/label_style" />
        <EditText
            android:id="@+id/etPriceFrom"
            android:layout_marginLeft="4dp"
            android:layout_marginStart="4dp"
            android:minWidth="60dp"
            android:layout_width="wrap_content"
            android:layout_height="wrap_content" />
        <TextView
            android:text="@string/filter_price_up_to"
            android:layout_width="wrap_content"
            android:layout_height="wrap_content" />
        <EditText
            android:id="@+id/etPriceTo"
            android:layout_marginLeft="4dp"
            android:layout_marginStart="4dp"
            android:minWidth="60dp"
            style="@style/label_style"/>
    </LinearLayout>
    <RelativeLayout
        android:layout_width="match_parent"
        android:layout_height="wrap_content">
        <LinearLayout
            android:id="@+id/llLowerBound"
            android:layout_marginLeft="32dp"
            android:layout_alignParentLeft="true"
            android:orientation="horizontal"
            android:layout_width="wrap_content"
            android:layout_height="wrap_content">
            <CheckBox
                android:id="@+id/cbIncludeLower"
                android:layout_width="wrap_content"
                android:layout_height="wrap_content" />
            <TextView
                android:layout_gravity="fill"
                android:text="@string/include_lower"
                style="@style/label_style" />
        </LinearLayout>
        <LinearLayout
            android:layout_marginLeft="160dp"
            android:orientation="horizontal"
            android:layout_width="wrap_content"
            android:layout_height="wrap_content">
            <CheckBox
                android:id="@+id/cbIncludeUpper"
                android:layout_width="wrap_content"
                android:layout_height="wrap_content" />
            <TextView
                android:layout_gravity="fill"
                android:text="@string/include_upper"
                style="@style/label_style" />
        </LinearLayout>
    </RelativeLayout>
</LinearLayout>
<?xml version="1.0" encoding="utf-8"?>
<LinearLayout xmlns:android="http://schemas.android.com/apk/res/android"
xmlns:tools="http://schemas.android.com/tools"
android:orientation="horizontal"
android:layout_width="wrap_content"
android:layout_height="wrap_content"
tools:showIn="@layout/filter_layout">
<CheckBox
android:id="@+id/cbPlatformFilter"
android:layout_width="wrap_content"
android:layout_height="wrap_content" />
<TextView
android:layout_marginLeft="8dp"
android:layout_marginStart="8dp"
android:text="@string/filter_platform"
style="@style/label_style" />
<EditText
android:id="@+id/etPlatformFilter"
android:layout_marginLeft="4dp"
android:layout_marginStart="4dp"
android:minWidth="60dp"
android:layout_width="wrap_content"
android:layout_height="wrap_content" />
</LinearLayout>The filter dialog screen is shown in Figure 2.4
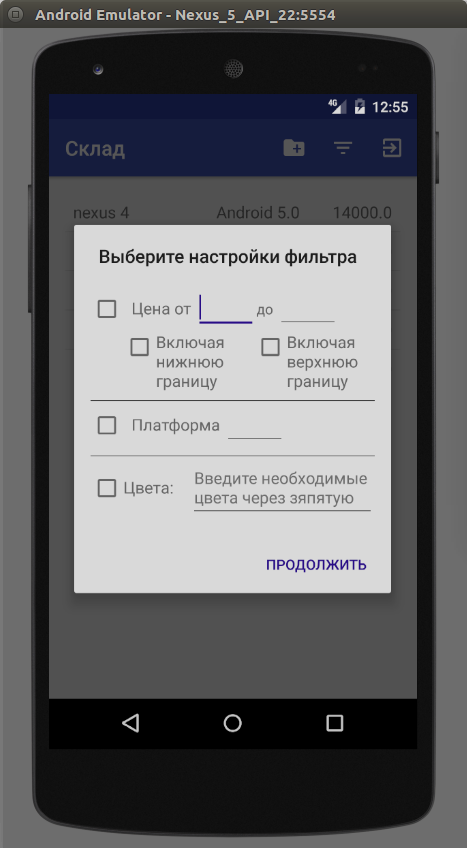
Figure 2.4 — filter dialog screen.
On this dialog screen, a user can specify database sample criteria as follows: Device price Device platform (Android or iOS, plus operation system version number). * Available colours.
When pressing the «Continue» button, we check whether the CheckBox elements were chosen and, if yes, we set the corresponding filter.
Code listing for setting a filter:
public void showFilterDialog(final CallbackFilterDialog callbackFilterDialog) {
    final View v = LayoutInflater.from(context).inflate(R.layout.filter_layout, null);
    final CheckBox cbPriceFilter = ButterKnife.findById(v, R.id.cbPriceFilter);
    final CheckBox cbPlatformFilter = ButterKnife.findById(v, R.id.cbPlatformFilter);
    final CheckBox cbColourFilter = ButterKnife.findById(v, R.id.cbColorFilter);
    final EditText etPlatformFilter = ButterKnife.findById(v, R.id.etPlatformFilter);
    final EditText etColors = ButterKnife.findById(v, R.id.etColors);

    AlertDialog.Builder builder = new AlertDialog.Builder(context)
            .setTitle(R.string.titleChooseFilterProperties)
            .setPositiveButton(R.string.continue_action, new DialogInterface.OnClickListener() {
                @Override
                public void onClick(DialogInterface dialog, int which) {
                    Query query = new Query(MainActivity.COLLECTION_NAME);
                    if (cbPriceFilter.isChecked()) {
                        setPriceFilter(v, query);
                    }

                    if (cbPlatformFilter.isChecked()) {
                        query.equalTo(new DocumentFields(context).getPlatformField(), etPlatformFilter.getText().toString());
                    }

                    if(cbColourFilter.isChecked()) {
                        List<Object> colors = new ArrayList<>();
                        colors.addAll(Arrays.asList(Helper.getStringFrom(etColors).split(",")));
                        query.containedIn(new DocumentFields(context).getColorsAvailableField(), colors);
                    }
                    query.findDocuments(new CallbackFindDocument() {
                        @Override
                        public void onDocumentFound(List<DocumentInfo> documentInfos) {
                             callbackFilterDialog.onFilterApplied(documentInfos);
                        }
                        @Override
                        public void onDocumentNotFound(String errorCode, String errorMessage) {
                            Helper.showToast(context, R.string.error);
                        }
                    });
                }
            }).setView(v);
    builder.show();
}

private void setPriceFilter(View view, Query query) {
    String priceField = new DocumentFields(view.getContext()).getDevicePriceField();
    final CheckBox cbIncludeLower = ButterKnife.findById(view, R.id.cbIncludeLower);
    final CheckBox cbIncludeUpper = ButterKnife.findById(view, R.id.cbIncludeUpper);
    final EditText etLowerPrice = ButterKnife.findById(view, R.id.etPriceFrom);
    final EditText etUpperPrice = ButterKnife.findById(view, R.id.etPriceTo);
    if(cbIncludeLower.isChecked()) {
        query.greaterThenOrEqualTo(priceField, getPrice(etLowerPrice));
    } else {
        query.greaterThan(priceField, getPrice(etLowerPrice));
    }
    if(cbIncludeUpper.isChecked()) {
        query.lessThanOrEqualTo(priceField, getPrice(etUpperPrice));
    } else {
        query.lessThan(priceField, getPrice(etUpperPrice));
    }
}
A filter can be set as follows: we create a Query object, taking samples from our collection. If the price filter is applied (it is ticked off), then we choose only the devices within the set price range in our database.
The price range is set with the following methods: greaterThan sets the lower price limit (excluding the quoted price number). lessThan sets the upper price limit (excluding the quoted price number). greaterThanOrEqualTo sets the lower price limit including the quoted price number. lessThanOrEqualTo sets the upper price limit including the quoted price number.
Platform search is set using the equalTo(field, value) method of the Query class which tells to an instance of the class to leave inside the sample only the documents whose field value in the field parameter corresponds to the value. As an example in our case, we can find all Android 7.0 devices by setting query.equalTo(«platform», «Android 7.0»);.
Colour search is set using the containedIn method of the Query class which leaves leave inside the sample only the documents whose fields (array) contains all elements of the given array.
With this we form a query for the given database collection and receive copies of the DocumentInfo class which characterize the documents appropriate for this query. We pass this information in the Activity using a callback and them we update the information.
When pressing the button we end the user active session (logout) so the user is back at the Launch Screen.
To achieve this we need to set a click event handler for this button, it will run logout of the User class to end the active session:
public static void logout(final Context context) {
    LocalPersistence.writeObjectToFile(context, null, LocalPersistence.FILE_USER_INFO);
    new User().logout(new CallbackLogoutUser() {
        @Override
        public void onLogoutSucceed() {
            display(context);
        }

        @Override
        public void onLogoutFailed(String errorCode, String errorMessage) {
            Helper.showToast(context, R.string.error);
        }
    });
}logout(…) method of the User class which ends the user active session.
In case the session was ended successfully the onLogoutSucceed(...) callback iterface method will be executed. Otherwise, it is the onLogoutFailed(...) method that will be executed.
Device Details Screen.
When pressing on any element of the device list on the application main screen, a user moves to the screen with detailed information about the chosen device.
Let's create an Activity called ItemDetailsInfo and add the following xml code to its layout file:
<?xml version="1.0" encoding="utf-8"?>
<LinearLayout xmlns:android="http://schemas.android.com/apk/res/android"
    xmlns:tools="http://schemas.android.com/tools"
    android:id="@+id/activity_detailed_item_info"
    android:layout_width="match_parent"
    android:layout_height="match_parent"
    android:padding="16dp"
    android:orientation="vertical"
    tools:context="prof_itgroup.ru.storehouseapp.Activities.ItemDetailsActivity">
    <ScrollView
        android:layout_width="match_parent"
        android:layout_height="wrap_content">
            <include layout="@layout/item_core"/>
    </ScrollView>
</LinearLayout>
As you can see, the Activity layout file re-uses xml code of the Add an Item screen yet this screen also presents a possibility to switch to the Edit mode, i.e. to activate hidden View of the screen.
In ActionBar of the screen we will also add icons to edit a device entry (document), to remove a device entry (document) and to proceed to the delivery information screen.
To set the icons in ActionBar let's create a layout file called detailed_info_menu and add to it the following code lines:
<menu xmlns:android="http://schemas.android.com/apk/res/android"
    xmlns:app="http://schemas.android.com/apk/res-auto">
    <item
        android:id="@+id/action_edit_item"
        android:title="@string/action_edit_item"
        android:icon="@drawable/ic_mode_edit_white_24dp"
        app:showAsAction="always"/>

    <item
        android:id="@+id/action_remove_item"
        android:title="@string/action_remove_item"
        android:icon="@drawable/ic_delete_forever_white_24dp"
        app:showAsAction="ifRoom"/>

     <item
        android:id="@+id/action_prepare_item"
        android:icon="@drawable/ic_assignment_white_24dp"
        android:title="@string/action_prepare_item"
        app:showAsAction="ifRoom"/>
</menu>
Inside the Activity let's add the following method:
@Override
public boolean onCreateOptionsMenu(Menu menu) {
    getMenuInflater().inflate(R.menu.detailed_info_menu, menu);
    return super.onCreateOptionsMenu(menu);
}
which will install icons into ActionBar.
We will handle clicks on buttons with the method described below:
@Override
public boolean onOptionsItemSelected(MenuItem item) {
    switch (item.getItemId()) {
        case android.R.id.home:
            finish();
            break;
        case R.id.action_edit_item:
            setEditMode(true);
            break;
        case R.id.action_remove_item:
            DocumentHelper.fetchAndRemoveDocument(this, document, getDocumentInfo());
            break;
        case R.id.action_prepare_item:
            SendItemActivity.display(this, getDocumentInfo());
            break;
    }
    return super.onOptionsItemSelected(item);
}
As a result we should get the screen shown in Figure 3.1

Figure 3.1 — device details screen.
The following icons are located in the right upper side of the screen:
 Edit device info
 Remove this device from the database
 Switch to the device shipping info.
When a user presses the button, the sreen switches to the edit mode. To do so let's make these buttons visible: "Add colour", "Remove colour", "Increase store price", "Lower store price". Device details screen in the edit mode is shown in Figure 3.2.
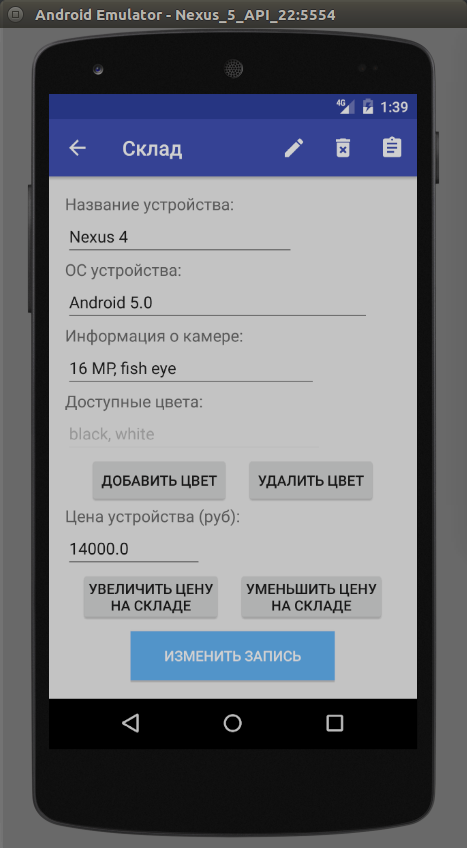
Figure 3.2 — Device details screen in the edit mode
Let's define the click event handler for the «Change Item» button which will execute the following code:
private void updateItemDocument() {
    document.getDocumentById(getDocumentInfo().getId(), new CallbackGetDocumentById() {
        @Override
        public void onDocumentFound(DocumentInfo documentInfo) {
            document.updateDocument()
                    .set(fields.getDeviceNameField(), getStringFrom(etDeviceName))
                    .set(fields.getPlatformField(), getStringFrom(etDevicePlatform))
                    .set(fields.getCameraInfoField(), getStringFrom(etDeviceCameraInfo));
            setColorsUpdateInfo();
            document.updateDocument().inc(fields.getDevicePriceField(), increaseCount);
            document.saveDocument(new CallbackDocumentSaved() {
                @Override
                public void onDocumentSaved() {
                    setEditMode(false);
                    for (String color : deviceColors.keySet()) {
                        deviceColors.put(color, ColorState.FROM_DB);
                    }
                    document.updateDocument().getUpdateInfo().clear();
                }
                @Override
                public void onDocumentSaveFailed(String errorCode, String errorMessage) {
                    showToast(R.string.error_update_item);
                    setFields();
                }
            });
        }
        @Override
        public void onDocumentNotFound(String errorCode, String errorMessage) {
            showToast(R.string.error_update_item);
            setFields();
        }
    });
}
private void setColorsUpdateInfo() {
    for (String color : deviceColors.keySet()) {
        ColorState colorState = deviceColors.get(color);
        switch (colorState) {
            case TO_REMOVE:
                document.updateDocument().pull(fields.getColorsAvailableField(), color);
                break;

            case NEW:
                document.updateDocument().push(fields.getColorsAvailableField(), color);
                break;
        }
    }
}
To update device information we use the updateDocument() method of the Document class. In this case, the instance of the Document class wich we are updating should be linked to a real document in the database using the getDocumentById method. New values for the fileds below are set with the set(field, value) method of the Update class.
- Device Name ( deviceName field in the database)
- Device OS (platform field in the database)
- Camera Information (deviceCameraInfo)
The «device price» field (devicePrice in the database) is set with the .inc(field, value) mehod of the Update class. When we increase the price, we use positive prarameter values, and when we decrease it, then we use the negative ones.
The «avaliable colours» field (colorsAvailable in the database) is set with the .push() method (to add a colour) and the .pull() method (to remove a colour).
Let's look again at the updateItemDocument(...) method: to update the document fields we need to verify that such document exists and to link our instance of the Document class to a document in the database. To do so we can use the .getDocumentById(…) method of the Document class.
After we have linked our document to the database one, we receive an object of the Update class using the .updateDocument() method. With that object we set a device name, OS and camera informaton using the .set(…) method. We can add to the array (with the .push() method) or remove from the array (with the .pull method) avaliable colours for this device and change its price in the price field (with the .inc() method). When all udates are done in our instance of the Update class, we save the document using the .saveDocument(…) method of the Document class.
Since we received the document via linking it with another document from the database, (using the .getDocumentById method), the result of running .saveDocument(…) is an updated documet, not a new one.
Let's consider the button - when pressed, the information is about a device is deleted from the database. To do so, we can add a click event handler which would trigger a method shown below:
public static void fetchAndRemoveDocument(final Context context, final Document document, DocumentInfo documentInfo) {
    document.getDocumentById(documentInfo.getId(), new CallbackGetDocumentById() {
        @Override
        public void onDocumentFound(DocumentInfo documentInfo) {
            removeDocument(context, document);
        }
        @Override
        public void onDocumentNotFound(String errorCode, String errorMessage) {
            Helper.showToast(context, R.string.error_document_not_removed);
        }
    });
}
public static void removeDocument(final Context context, Document document) {
        document.removeDocument(new CallbackRemoveDocument() {
            @Override
            public void onRemoveSucceed(ResponseRemove responseRemove) {
                Toast.makeText(context, context.getString(R.string.document_removed), Toast.LENGTH_SHORT).show();
                ((Activity) context).finish();
            }
            @Override
            public void onRemoveFailed(String errorCode, String errorMessage) {
                Toast.makeText(context, context.getString(R.string.error_document_not_removed), Toast.LENGTH_SHORT).show();
            }
        });
}
Let's consider this method in more detail. At first we use the .getDocumentById(...) method of the Document class to check whether a document exists and to link this document with our created instance of the Document class.
After we verified the document we can execute the .removeDocument() method of the Document class which deletes the document form the database.
The button switches a screen to the screen with device shipping information.
Device Shipping Info Screen.
Let's create a new activity called SendItemActivity and add the following xml code lines into its layout file:
<?xml version="1.0" encoding="utf-8"?>
<LinearLayout xmlns:android="http://schemas.android.com/apk/res/android"
    xmlns:tools="http://schemas.android.com/tools"
    android:id="@+id/activity_send_item"
    android:layout_width="match_parent"
    android:layout_height="match_parent"
    android:padding="16dp"
    android:orientation="vertical"
    tools:context="prof_itgroup.ru.storehouseapp.Activities.SendItemActivity">
    <LinearLayout
        android:id="@+id/llWaitingUsers"
        android:orientation="vertical"
        android:layout_width="match_parent"
        android:layout_height="wrap_content">
        <TextView
            style="@style/label_style"
            android:textColor="@android:color/black"
            android:text="@string/action_waiting_list"/>
        <TextView
            android:id="@+id/tvWaitingUsers"
            style="@style/label_style"/>
        <TextView
            android:id="@+id/tvLastChangeLabel"
            android:textColor="@android:color/black"
            android:layout_marginTop="8dp"
            style="@style/label_style"
            android:text="@string/last_change"/>
        <TextView
            android:id="@+id/tvLastChange"
            style="@style/label_style"/>
        <LinearLayout
            android:id="@+id/llInfoContainer"
            android:orientation="vertical"
            android:layout_width="match_parent"
            android:layout_height="wrap_content">
            <RelativeLayout
                android:layout_width="match_parent"
                android:layout_height="wrap_content">
                <TextView
                    android:layout_marginTop="8dp"
                    android:textColor="@android:color/black"
                    android:text="@string/item_info"
                    style="@style/label_style" />
                <TextView
                    android:id="@+id/tvEdit"
                    android:layout_alignParentRight="true"
                    android:layout_marginTop="10dp"
                    android:text="@string/editInfo"
                    android:textColor="@color/colorPrimary"
                    android:layout_width="wrap_content"
                    android:layout_height="wrap_content" />
            </RelativeLayout>
            <ScrollView
                android:layout_marginTop="8dp"
                android:layout_width="wrap_content"
                android:layout_height="180dp">
                <EditText
                    android:id="@+id/etItemInfo"
                    android:enabled="false"
                    android:layout_width="wrap_content"
                    android:layout_height="180dp" />
            </ScrollView>
        </LinearLayout>
    </LinearLayout>
    <LinearLayout
        android:orientation="vertical"
        android:layout_gravity="center_horizontal"
        android:layout_width="wrap_content"
        android:layout_height="wrap_content">
        <Button
            android:layout_marginTop="8dp"
            android:layout_gravity="center_horizontal"
            android:id="@+id/btnAppUserInList"
            android:text="@string/addUserInList"
            android:layout_width="match_parent"
            android:layout_height="wrap_content" />
        <Button
            android:layout_marginTop="8dp"
            android:layout_gravity="center_horizontal"
            android:id="@+id/btnSendToUser"
            android:text="@string/sendToUser"
            android:layout_width="match_parent"
            android:layout_height="wrap_content" />
    </LinearLayout>
</LinearLayout>
The created screen is shown in Figure 4.1
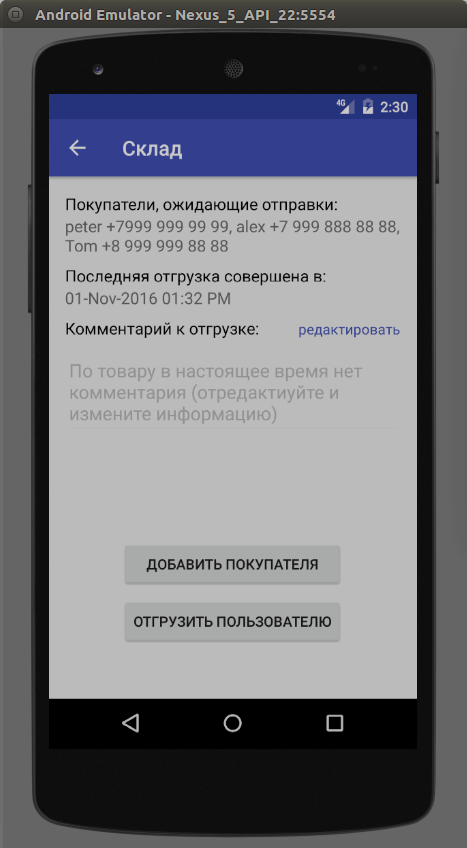
Figure 4.1 — Device Shipping Info Screen
When the «ADD BUYER» button is pressed, a dialog screen appears where one can enter information about a buyer. Afterwards, the following code is run:
private void addBuyerAndRefreshWaitingList(final String buyerInfo) {
    if(!buyerInfo.trim().isEmpty()) {
        document.getDocumentById(getDocumentInfo().getId(), new CallbackGetDocumentById() {
            @Override
            public void onDocumentFound(DocumentInfo documentInfo) {
                document.updateDocument().push(fields.getBuyersField(), buyerInfo);
                document.saveDocument(new CallbackDocumentSaved() {
                    @Override
                    public void onDocumentSaved() {
                        document.updateDocument().getUpdateInfo().clear();
                        refreshWaitingList();
                        showToast(getBaseContext(), R.string.add_waiting_buyer);
                    }
                    @Override
                    public void onDocumentSaveFailed(String errorCode, String errorMessage) {
                        showToast(getBaseContext(), R.string.error);
                    }
                });
            }
            @Override
            public void onDocumentNotFound(String errorCode, String errorMessage) {
                showToast(getBaseContext(), R.string.error);
            }
        });
    }
}
Let's consider the method in more details. At first, we use verify that the buyer's name field is not empty. In case a user did provide with the buyer's information, the instance of the Document class is linked to the document in the database. Afterwards, the document data is updated and the entered information about the buyer is added to the end of the buyers array with the .push() method of the Update class. This is how a queue is formed which consists of buyers waiting for thier goods shipment.
When the «SHIP TO BUYER» button is pressed, the first client in the waiting clients queue array gets deleted. Alongside this, the latest shipment time should be recorded and the employees should be notified about it (e.g. movers, delivery drivers, accountants).
To do this, we can add a click event handler which executes the following method:
@OnClick(R.id.btnSendToUser)
public void onSendToUserButtonClicked() {
    document.getDocumentById(getDocumentInfo().getId(), new CallbackGetDocumentById() {
        @Override
        public void onDocumentFound(final DocumentInfo documentInfo) {
            document.updateDocument()
                    .popFirst(fields.getBuyersField())
                    .setCurrentDate(fields.getLastSendField());

         document.saveDocument(new CallbackDocumentSaved() {
                @Override
                public void onDocumentSaved() {
                    document.updateDocument().getUpdateInfo().clear();
                    new ItemNotificator(getBaseContext(), documentInfo.getId(), fields.getDeviceName()).notifyPersonalAboutItemSend();
                    new BalanceNotificator(getBaseContext()).refreshCompanyBalance();
                    etItemInfo.setVisibility(View.VISIBLE);
                    etItemInfo.append(fields.getLastSendTime());
                    refreshWaitingList();
                }

               @Override
                public void onDocumentSaveFailed(String errorCode, String errorMessage) {
                    showToast(getBaseContext(), R.string.error);
                }
            });
 }
In this method, we can see a Document class instance being linked to a document from the database with the .getDocumentById() method of the Document class. We use its .popFirst method which deletes the first element of an array (imitating attending to the first person in a queue). Furthermore, the time of the last shipment is recorded in the field called "Last shipment occurred..." (lastSend in the database) using the .setCurrentDate(…) method of the Update class.
The screen also contains comments about the shipment, which are stored in the document file (sendInfo field of the File type). By default, this file does not exist and the text screen shows "No comments about the device...". A user can press the Edit button, change the shipment comment and press the Save button. It will execute the following method:
public static void uploadFile(final Context context, Document document, String content) {
    document.uploadFile(new DocumentFields(context).getSendInfoField(), FILE_NAME, encode(content.getBytes()),
        new CallbackUploadFile() {
        @Override
        public void onDocumentUploaded() {
        //file loaded
        }

        @Override
        public void onDocumentUploadFailed(String errorCode, String errorMessage) {
            Helper.showToast(context, R.string.error);
        }
    });
}
This method uploads the file into a document field (File type) in the database. The document should be linked with the getDocumentById(…) method. A similar routine happens when a document is deleted from the database.
Waiting users' information and shipment comments are retrieved from the server using the method shown below:
private void refreshWaitingList() {
    document.getDocumentById(getDocumentInfo().getId(), new CallbackGetDocumentById() {
        @Override
        public void onDocumentFound(DocumentInfo documentInfo) {
            fields.setDocumentInfo(documentInfo);
            tvWaitingUsers.setText(fields.getBuyers());
            tvLastChange.setText(fields.getLastSendTime());
            llWaitingUsers.setVisibility(fields.getBuyers().isEmpty() ? View.GONE : View.VISIBLE);
            tvLastChangeLabel.setVisibility(fields.getLastSendTime().isEmpty() ? View.GONE : View.VISIBLE);
            tvLastChange.setVisibility(fields.getLastSendTime().isEmpty() ? View.GONE : View.VISIBLE);
            btnSendToUser.setVisibility(fields.getBuyers().isEmpty() ? View.GONE : View.VISIBLE);
            document.getFileContent(fields.getSendInfoField(), FileHelper.FILE_NAME, new CallbackGetFile() {
                @Override
                public void onSucceed(String fileContent) {
                    if(fileContent != null && !fileContent.trim().isEmpty()) {
                        etItemInfo.setText(fileContent);
                    } else {
                        etItemInfo.setText(R.string.no_info);
                    }
                }
                @Override
                public void onFailed(String errorCode, String errorMessage) {
                    showToast(getBaseContext(), R.string.error);
                }
            });
        }
        @Override
        public void onDocumentNotFound(String errorCode, String errorMessage) {
            tvWaitingUsers.setVisibility(View.GONE);
        }
    });
}
In this method, we can see a Document class instance being linked to a document from the database, which leads to the following fields updating on the screen:
1. users waiting queue list
2. time of the last shipment
3. setting visibility of different elements depending on the content
Using the getFileContent method of the Document class we can receive the file contents as a line (with formating). The line then is set in the comment field.
Lets also create the ItemNotificator class and add the notifyPersonalAboutItemSend() method to it. The method will be called when a device is shipped to a user. Its code is shown below:
```public void notifyPersonalAboutItemSend() { sendPushToLoaderPerson(); sendEmailInAccountingDepartment(); sendSmsToDeliveryPerson(); }
This method is notifying the employees stating that the device is ready for shipment. It does so by:

- sending a push notification to a mover with the following:

```Java
private void sendPushToLoaderPerson() {
    Query query = new Query("roles");
    query.equalTo("name", "loaderPerson");
    query.equalTo("isFree", true);
    query.setLimit(1);

    MessagePush messagePush = new MessagePush(context.getString(R.string.you_should_take) + getItemInfo() + context.getString(R.string.and_prepare), null);
    message.sendPush(messagePush, query, new CallbackSendPush() {
        @Override
        public void onPushSended() {
            Helper.showToast(context, R.string.push_sended);
        }
        @Override
        public void onPushSendFailed(String errorCode, String errorMessage) {
            Helper.showToast(context, R.string.cant_send_push);
        }
    });
}- sending a text (sms) to a delivery person:
private void sendSmsToDeliveryPerson() {
    Query query = new Query("roles");
    query.equalTo("name", "deliveryPerson");
    query.equalTo("isFree", true);
    query.setLimit(1);

    MessageSms messageSms = new MessageSms(context.getString(R.string.take_item) + getItemInfo());
    message.sendSms(messageSms, query, new CallbackSendSms() {
        @Override
        public void onSmsSended() {
            Helper.showToast(context, R.string.sms_was_sended);
        }

        @Override
        public void onSmsSendFailed(String errorCode, String errorMessage) {
            Helper.showToast(context, R.string.cant_send_sms);
        }
    });
}- sending an email to the accountants' office:
private void sendEmailInAccountingDepartment() {
    Query query = new Query("roles");
    query.equalTo("name", "accountantPerson");

    MessageEmail messageEmail = new MessageEmail(context.getString(R.string.from), context.getString(R.string.device) + getItemInfo() , context.getString(R.string.device) + getItemInfo() + context.getString(R.string.sold));
    message.sendEmail(messageEmail, query, new CallbackSendEmail() {
        @Override
        public void onEmailSend() {
            Helper.showToast(context, R.string.email_was_sended);
        }
        @Override
        public void onEmailSendFailed(String errorCode, String errorMessage) {
            Helper.showToast(context, R.string.cant_send_email);
        }
    });
}
Let's consider how these methods work in detail:
- In the
sendEmailInAccountingDepartmentmethod the following happens: the «accountantPerson» role is chosen from the roles collection and all users with this role are sent emails using the.sendEmail()method of theMessageclass. - In the
sendSmdToDeliveryPersonmethod the following happens: one unoccupied employee (setLimit(1)andsFree == trueconditions) with the «deliveryPerson» role is chosen from the roles collection and is sent a text (sms) using the.sendSmsmethod of theMessageclass. - In the
sendSmdToLoaderPersonmethod the following happens: one unoccupied employee (setLimit(1)andsFree == trueconditions) with the «loaderPerson» role is chosen from the roles collection and is sent a push notification using the.sendPushmethod of theMessageclass.
After the "SHIP TO BUYER" button is pushed the refreshCompanyBalance() method of the BalanceNotivicator class is executed.
The resreshCompanyBalance() method listing:
public void refreshCompanyBalance() {
    Script script = new Script();
    script.runScript(" 5800ad9342d52f1ba275fbcd", new CallbackSendScript() {
        @Override
        public void onScriptSended() {
            Helper.showToast(context, R.id.balance_refreshed);
        }
        @Override
        public void onScriptSendFailed(String errorCode, String errorMessage) {
            Helper.showToast(context, R.id.can_refresh_balance);
        }
    });
}
In this listing, the server-side code with 5800ad9342d52f1ba275fbcd ID is called using the runScript(...) method of the Script class. It recounts the goods in our storehouse and adjusts the storage costs, the balance and other characteristics.